 THE GAME ARCHIVE
Basic Controls and Movement
Movement in The Legend of Zelda is handled with the D-pad, which the official manual lists under "Basic Controls" as the "Move" input. Because the same D-pad also steers Link through the overworld, traversal and positioning share a single control; you shift in a direction, stop, and the game registers that direction for the next sword swing or item use. The manual's control table pairs "Move" with the D-pad and separates it from the action buttons, so walking toward an enemy and facing it are both consequences of where you point the pad.
Attacking and item use sit on separate buttons. The A button is dedicated to "Attack with sword," while the B button is assigned to "Use equipped item." This split means the sword is always your default action on A, and whatever item currently sits in the equipped slot fires on B, so switching items on the subscreen changes what B does without disturbing sword attacks. START handles the subscreen and confirms selections, and SELECT pauses and navigates menus, keeping movement, combat and menu handling on distinct inputs.
Subscreen and Menu Navigation
Subscreen and menu navigation rely on two distinct buttons. The START button performs two functions: "Display subscreen / Confirm selections," while the SELECT button handles "Pause / Menu navigation." When the player presses START, the subscreen appears; the same button then confirms whatever selection is highlighted. SELECT, by contrast, is used both to pause the game and to move through menu options. Moving the cursor or highlight within these menus is done with the D-pad, the same control that handles basic movement during play. The manual lists these assignments together under "1 Controls" on page 2, making the button roles explicit: START for opening and confirming, SELECT for pausing and navigating. No other button is documented for these specific subscreen or menu actions.
The documented rules create a clear division of labor. START is not only for display; it also confirms selections, so the same press can open the subscreen and then finalize a choice. SELECT is not solely for pausing; it also drives menu navigation, meaning the player uses it to move through menu items. The D-pad contributes to both normal movement and menu positioning, since the manual groups "Move" under basic controls and assigns no separate directional input for menus. This interaction means a player can expect START to open and confirm, SELECT to pause and navigate, and the D-pad to shift the highlight. The manual does not describe any additional button for these subscreen functions.
Radar and On-Screen Status
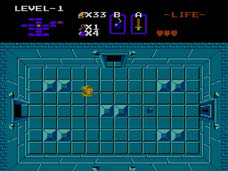
The main screen displays a radar at position 5, which shows Link's location as he moves through the current dungeon. The radar is one of several elements on the main screen, alongside the current dungeon number, the count of Rupees, Keys, and Bombs, the equipped item or Sword, and the heart meter. When Link acquires the Compass item, this radar additionally indicates the location of the Triforce fragment within the dungeon. The Compass itself is found among the items listed on manual page 7, and its effect is specifically described as allowing the player to see the Triforce fragment's position on the radar. Thus, the radar has a movement-based function from the start and gains a second, item-dependent function once the Compass is collected. The radar does not show the full dungeon layout; that function is tied to the Map item.
The Map item is explicitly described as letting the player see the layout of the entire dungeon. Unlike the radar, which is a persistent part of the main screen and changes function when the Compass is acquired, the Map provides full dungeon layout information as an item-based ability. The manual's item list distinguishes the Map from the Compass: the Map shows the dungeon layout, while the Compass shows the Triforce fragment's location on the radar. These two items therefore supply separate information, and both can be collected. The radar and on-screen status thus reflect a split between a default indicator that tracks Link's current position and item-triggered indicators that reveal either the dungeon's overall structure or the objective's location.
Heart Meter and Damage
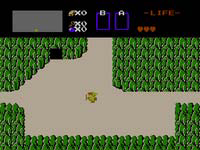
The heart meter in The Legend of Zelda represents Link's life force, and the manual specifies exactly how it changes during play. According to page 4, if you touch an enemy or are hit by an enemy attack, your heart meter will go down. The rule applies equally to simple contact and to projectile or melee attacks, so brushing against a foe is as damaging as being struck by one. When the meter is fully depleted, the manual states plainly: if you run out of hearts, it's game over. There is no partial penalty or respawn described at that point; the run ends.
Hearts function as the recovery counterpart to that damage rule. The Items section on page 7 lists Hearts among the pickups Link can collect, with the stated effect of restoring Link's heart meter. Picking one up is automatic: walk over an item to pick it up, so no button press is needed to collect a Heart. In shops, the same section says you walk over the item and then use your Rupees to purchase it, placing Hearts in the same walk-over collection system as other items.
Items and Their Uses
Items are collected by walking over them to pick them up automatically. In shops, Link must walk over the item and then use Rupees to purchase it. Rupees themselves serve as the monetary unit in this world, and you can use them to shop. Bombs attack enemies and blast holes in walls. Hearts restore Link's heart meter. The Map reveals the layout of the entire dungeon, while the Compass shows the location of the Triforce fragment on the radar. The Magical Key opens locked doors.
Rupees function only as currency, used to buy items in shops after walking over them. Bombs have two documented effects: attacking enemies and blasting holes in walls. Hearts fill the heart meter. The Map provides the dungeon's full layout, and the Compass pinpoints the Triforce fragment on the radar. The Magical Key opens locked doors. These rules interact: bombs create passages, the Map and Compass guide toward the fragment, and the Magical Key unlocks barriers.
Progression and Saving
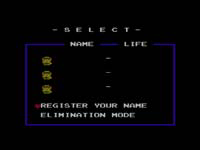
Progression in Hyrule starts with the file selection screen, reached by pressing START on the title screen. From there you select REGISTER YOUR NAME using SELECT and press START to enter your character's name, then choose REGISTER END with SELECT and press START to create a new game file. The created file is what you select to begin play. Files can be removed through ELIMINATION MODE, and the manual warns that deleted files cannot be recovered. Separately, loading a file you have saved previously restarts you at the beginning of the game, regardless of where you were when you saved.
The manual's objective requires collecting the eight fragments of the Triforce of Wisdom to enter Death Mountain, the lair of Ganon, Prince of Darkness, then defeating him and rescuing Princess Zelda. Hyrule is a large, open overworld with underworld dungeons scattered throughout, and you explore the overworld to discover dungeon entrances. Touching an enemy or being hit by an enemy attack lowers your heart meter, and running out of hearts is game over. When that game-over screen appears, selecting SAVE saves your progress and returns to file selection, CONTINUE resumes from the area you were last in, and RETRY returns to file selection without saving. While the subscreen is displayed, pressing A and B together on a second controller also saves and quits.
Sources & further reading.
- The Legend of Zelda — official game manual Retrieved Oct 15, 2026
First published .