 THE GAME ARCHIVE
Piloting the Sub: Steering, Throttle, Ballast and Waypoints
Subwar 2050 separates piloting into directional, engine and ballast controls. Directional inputs turn, dive and climb, while pressing L enables single-plane manoeuvring: left and right turn the submarine without changing its roll angle, useful for lining up targets or travelling on the surface. Increase or decrease throttle with plus and minus; the bracket keys select one-third or two-thirds power, while Shift-minus and Shift-plus select minimum and maximum. For depth adjustments, 8 floods the ballast tanks, 0 blows them, and 9 adjusts them to hold the current depth. Combining dive controls with engine controls produces faster dives or climbs.
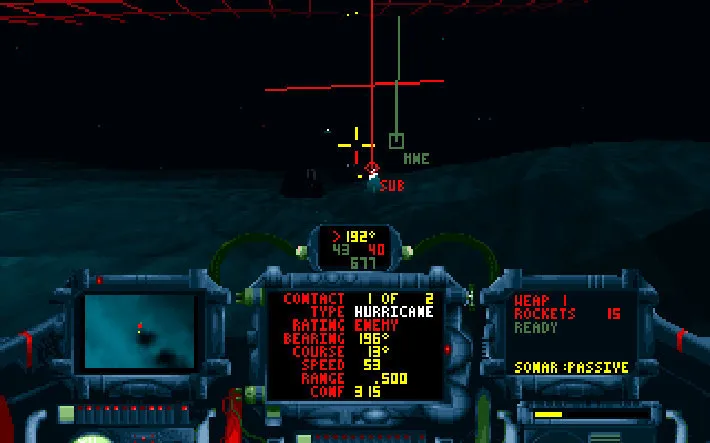
Navigation uses a cockpit-projected, three-dimensional seafloor display built from survey data, because ordinary visual navigation becomes impractical in the darkness below about 200 feet. The head-up display overlays steering references on that terrain view. Its short red artificial-horizon line shows whether the submarine has a level attitude, though it is not visible at steep nose-up or nose-down angles. A waypoint appears as a green triangle when you reach it; passing through its centre automatically switches navigation tracking to the next mission waypoint. That makes the triangle a passage to steer through, rather than merely a marker to approach.

Sonar Evasion: Thermal Cover, Noise and Contact Tracking
Thermal layers provide cover by reflecting sonar at the boundary between warm and cool water. Place that boundary between your submarine and an enemy, and your boat becomes invisible to its sonar. The head-up display distinguishes warm-to-cool boundaries with a green grid and cool-to-warm boundaries with a red grid. Contact markers help relate detected objects to this cover: ordinary sonar contacts appear in square boxes, while the selected target receives a diamond-shaped box. A vertical line connects a contact to the nearest thermal boundary, showing its distance from that boundary; without a nearby layer, the line is absent.
Noise is tracked separately on the Sonar Cross-Section display, a horizontal bar scale. Black means complete silence, yellow indicates noise that risks detection, and red means your position is being broadcast throughout the immediate vicinity. Run slowly and treat active sonar cautiously to keep that reading down. Active sonar also creates a detection trade-off: under realistic sonar rules, finding stationary enemies requires using it, but doing so broadcasts your own position. The Simplified sonar setting instead reveals all submarines within approximately one kilometre. Thermal cover, the noise meter and contact markers therefore provide distinct information about concealment and nearby objects.
Underwater Combat: Weapon Bays, Dogfight Practice and Settings
Combat starts with the Weapon Display: press B to change the selected weapon bay, then X to fire. Its top line identifies the bay, while the second names its weapon and shows how many remain. The status line distinguishes a weapon ready for launch from one that has just launched and is arming. To practise these actions, select Simulated Combat, which places you in a fighter-sub simulator amid a multi-submarine underwater dogfight without risking your pilot’s life. The session score considers both enemy submarines destroyed and weapons expended, so the number of shots used matters alongside the number of kills.
Combat settings change both the opposition and the consequences of contact. Enemy Skill Level offers High, Medium and Low settings, affecting opponents’ intelligence, aggression and numbers. With Collisions Off, hitting the seabed or another submarine does not damage your boat; switching collisions on makes play harder but earns a higher mission score. Targeting has a separate restriction worth distinguishing from visibility: even under Simplified sonar, a visible enemy cannot be targeted until active or passive sonar detects it. Realistic sonar displays only detected submarines and also awards a higher mission score, tying that setting’s stricter contact rules to scoring.
Campaign Missions: Briefings, Sub Configuration and Rewards
Campaign selection offers North Pacific training alongside four scenarios set in Antarctica, the North Atlantic, the South China Sea, and the North Pacific/Sea of Japan. Those four can be played in any order, and changing campaigns saves your previous progress. After creating or selecting a pilot and choosing a campaign, open Mission Briefing to consult Orders, the Mission Map and the 3-D Briefing. The latter adds waypoint-depth information to a three-dimensional view of the mission area. Its ten icons let you shift the view east, west, north, south, up or down, rotate it left or right, and tilt it forward or backward.
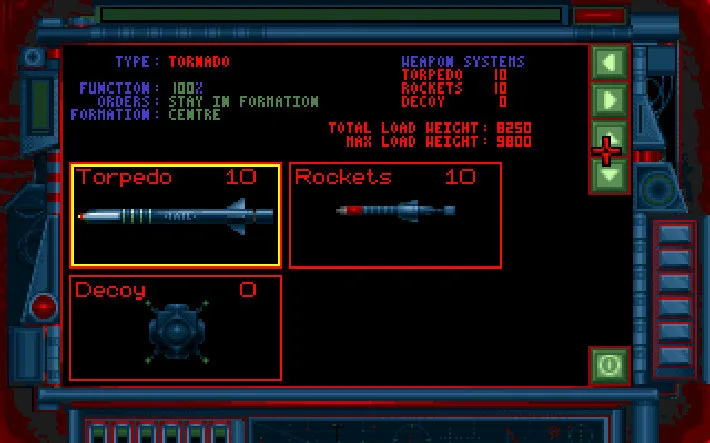
After the briefing, Configure Subs provides separate Configuration and Arming screens. The Configuration screen displays the mission's submarines in three dimensions, together with their payload, orders, type and formation position. Use the next and previous icons to select a submarine; yellow brackets identify the selected boat. Once the mission is complete, the debriefing summarises the result and pays you according to performance. Outstanding results can also earn awards from the mercenary’s union or your current employer. High mission points suffice for a mercenary award, while Corporate Awards are more valuable and involve fulfilling mission objectives with maximum damage to the enemy.
Sources & further reading.
- Subwar 2050 — official game profileRetrieved Nov 6, 2026
- Subwar 2050 — official game profile — publisher-supplied gameplay manualRetrieved Nov 6, 2026
First published .