 THE GAME ARCHIVE
Opening Kickoff: Modes and Start-Up
Tecmo Bowl arrives on the NES as an American Football game whose opening menu presents three ways to play. Press START after choosing "1Player" to test yourself against a computer opponent, "2Players" to face a friend, or "Coach" to act as Head Coach of a football team. In the single-player and Coach selections, you pick your team with the Control Pad and A button before the game begins. The 1Player option is described in the manual simply as "you vs. the computer."
In the 2Players mode, team selection follows the same Control Pad and A button method used for 1Player, but controller duties are split: the kicking team uses Controller 2, while the receiving team uses Controller 1. Saved games are resumed by typing the entire password with the Control Pad and then pressing A; passwords appear on the screen after a game is won. The manual's Getting Started section lists 1Player, 2Players, and Coach together, then directs you to press START to begin.
Two-Player Showdown: Controller Assignments
In the two-player mode, controller ownership is fixed to team role rather than to a player seat. The kicking team will use Controller 2, while the receiving team uses Controller 1. This assignment is stated directly alongside the mode's setup, so before the opening kick the two players know which pad drives which side. Selecting squads is handled the same way as in the solo option: 2Players Choose your teams by using the directional control and A. The manual adds that you Select your teams the same way you would when playing a 1Player game.
Because the kicking team is bound to Controller 2 and the receiving team to Controller 1, the assignment applies to the kickoff that opens the match. Controller 1 belongs to the side that receives; Controller 2 belongs to the side that kicks. Both players pick their teams before play through the same directional-and-A method already used in one-player setup. The documentation does not tie controller swapping to a score, a quarter, or a possession change, so the stated mapping holds as the two-player showdown begins.

Offensive Playbook: Snaps, Passes, and Receivers
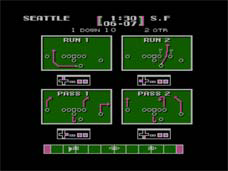
Offense starts on the Formation Selection Screen, where four play options map to distinct directions. Pressing + A selects one formation, + A another, + A a third, and + A a fourth, as labeled items 5 through 8 on that screen. The same screen also displays the down and yards needed for a first-down, plus the quarter, at item 4, while item 9 shows field position and an indicator of ball possession and direction. Your choice there determines whether a pass is even possible once the ball is live.
Once the formation is set, press A to snap the ball from the Center to the Quarterback. Passing is restricted to a Pass formation, so choosing correctly at selection governs whether you may throw. After the snap, pressing A again cycles through eligible Receivers, and the Receiver with the cursor over his head becomes the target of the pass attempt. That same A button, pressed repeatedly while carrying the ball, breaks the opponent's tackle. The Kick Meter at the top of the screen tracks kicking strength for kicks.
Defensive Stand: Tackles and Block Shedding
On defense in Tecmo Bowl, the A button selects which player you control, so you can switch to the defender nearest the ball-carrier before the play develops. When you reach the carrier, pressing B performs a diving tackle, and the manual states this tackle will stop any player, no matter how big he is. The diving tackle therefore works as a reliable way to bring down a runner rather than relying only on a standing collision. These two inputs cover the basic sequence: choose your defender, close the distance, then commit to the tackle with B.
Blockers complicate that sequence. As you close in on the ball-carrier to make the tackle, an opposing player may be there to block you. According to the manual, if you are being blocked, you press A repeatedly to shed the blocker. So the same button that selects a defender also serves as the escape input once contact is made with a blocker. Shedding the block with repeated A presses clears the path, after which you can resume pursuit and use B for the diving tackle. The documented rules give defense two distinct A functions: selection before the play and block shedding during it.
On-Field Art of the Break: Combat Controls
On offense, the manual's basic controls list assigns A to multiple actions: moving, selecting formations, making selections, and hiking the ball. It also states that you break a tackle on offense by pressing A repeatedly. The gameplay section spells out the same rule in fuller context: begin a play by pressing A to snap the ball from the Center to the Quarterback, and then, to avoid being tackled by the defense, repeatedly press A to break the opponent's tackle. After the snap during a pass formation, A also cycles through eligible Receivers, with the cursor marking the target.
On defense, the manual gives separate instructions. Use A to select the player you want to control. Press B to make a diving tackle, which the manual says will stop any player, no matter how big he is. As you close in on the ball-carrier, an opposing player may be there to block you; press A repeatedly to shed the blocker if you are being blocked. The basic controls list confirms the split: A repeatedly sheds a block on defense, while the diving tackle on B stops any player.
Reading the Field: Kick Meter, Progression, and HUD
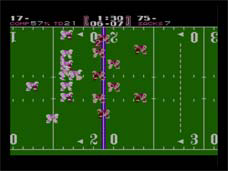
During a game, the Gameplay Screen shows three labeled elements. Number 1 is the Time / Score readout, giving the current clock and score. Number 2 is Player Number and Statistics, tracking the numbered player and his stats. Number 3 is the First-down Line, a visual marker for first-down progress. On the separate Formation Selection Screen, item 4 shows Down, Yards to go until a First-down, and Quarter, while item 9 is Field Position and an Indicator of Ball Possession and Direction. These readouts let you track down, distance, field position, and who has the ball without leaving the play-calling screen.
Kicking strength is read from the Kick Meter at the top of the screen: the higher the strength, the stronger the kick. To resume a saved game, input the whole password using the D-pad and A, then press A; passwords appear on the screen after a game is won. On offense, press A to snap the ball from the Center to the Quarterback, and you can avoid being tackled by repeatedly pressing A to break the opponent's tackle. Passes require a Pass formation; after the snap, press A to cycle eligible Receivers, and the Receiver with the cursor over his head is the target.
Sources & further reading.
- Tecmo Bowl — official game manual Retrieved Oct 15, 2026
First published .