 THE GAME ARCHIVE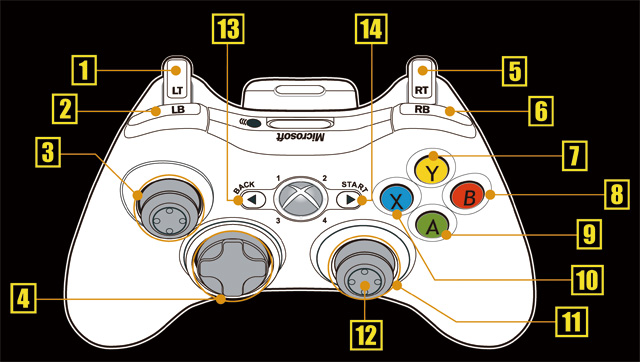
Moving, Dashing, and Taking Cover on PS3 and Xbox 360
On Xbox 360, the left stick moves your character, and moving it while pressing A performs a dash. Press LT during the dash to slide. LT also readies your weapon, with RT while holding LT mapped to an attack. Near a wall or object that provides cover, press LT to take cover. Low cover uses a further input: hold LT and press A. These are separate actions in the controller layout and the player-actions page, so the input depends on whether you are moving, dashing or standing near cover.
On PlayStation 3, move with the left stick and press it with the cross button to dash. Press L1 during a dash to slide. L1 readies your weapon or takes cover near a suitable wall or object; holding L1 and pressing cross uses low cover. To attack with a readied weapon, press R1 while holding L1. The publisher lists these as default controls, which can be adjusted from Options on the main menu or from the in-game Options menu.
Aiming, Quick Shots, and Switching Hands
On the PlayStation 3 and Xbox 360 releases, the right stick handles both aiming and camera movement, so lining up a shot means steering the view with the same input. Pressing the right stick button on Xbox 360, or R3 on the DualShock 3, switches the weapon to the other hand. That swap changes which side of the character the gun sits on, as described by the controller mapping. The documented notes list these as the default settings, adjustable from Options on the main menu or in-game, and they flag the screenshots as coming from the Xbox 360 version. The right stick is therefore your tool for acquiring targets and for flipping the firearm between hands.
A quick shot is performed by pressing the left trigger and right trigger together on Xbox 360, or L1 and R1 together on the DualShock 3. The game then automatically targets and attacks the enemy closest to you, and the move consumes the PC Gauge. Depending on your character and weapon, you may be able to pull off a succession of quick shots. The documentation also describes shooting a body part to stun an enemy, then moving in and pressing the attack button.
Melee, Partner Actions, and the PC Gauge
Melee attacks are performed by pressing the physical attack button, mapped to RT on Xbox 360 or R1 on DualShock 3. Each melee strike consumes part of the PC Gauge. When that gauge is empty, the only melee option remaining is a weak attack that leaves the character vulnerable. The PC Gauge therefore directly limits how often you can use stronger melee moves, and managing it becomes part of close-quarters combat.
Partner actions use B on Xbox 360 or circle on PlayStation 3. Physical attacks use a different button: RT on Xbox 360 or R1 on PlayStation 3. The distinction matters when reading the controller layout because the physical attack consumes PC Gauge, while the partner input is listed as a separate action. Capcom also gives a physical-attack example in which the player shoots a body part to stun an enemy, then moves in and presses the physical attack button.
Weapon and Item Management: Reload, Item Slots, and Directional Pad
On both PlayStation 3 and Xbox 360, the directional pad handles quick switches between weapons and throwables. Left and right on the pad cycle through your equipped weapons, while up and down toggle between grenades and first aid spray. This layout keeps both offensive and healing options on the same input without opening a menu. When you need to reload a firearm or grab an item from the ground, press the square button on DualShock 3 or the X button on Xbox 360. Those two functions share a single button, as listed in the controller documentation.
Open the item slots with Y on Xbox 360 or triangle on PlayStation 3. Herbs obtained during play are added to those slots and must be converted into tablets before use. The controller has a separate route-guide input, mapped to LB on Xbox 360 or L2 on PlayStation 3. That guide button differs from the weapon-ready and cover input, LT or L1 respectively. Keeping the item-slot, route-guide and healing inputs separate avoids mixing the two consoles’ layouts.
Healing: Health Tablets, First Aid Spray, and Herb Conversion
Herbs do not heal directly in this game; they function as raw material for tablets. When you pick up a herb, the game adds it to an item slot. From there you select the herb and use the insert-into-tablet command, pressing the circle button on the PlayStation 3 controller or the A button on the Xbox 360 controller, which stores the finished tablets in your tablet case. Mixing before conversion pays off: a single green herb yields one tablet, two green herbs yield three, three green herbs yield six, and a green herb combined with a red herb also yields six tablets. Once converted, each press of the R2 button on the PlayStation 3 controller or the RB button on the Xbox 360 controller consumes one tablet. That single tablet restores one block of the Vitality Gauge and refills the PC Gauge completely.
A second healing option, the First Aid Spray, is equipped from the Weapons Screen and used with RT on Xbox 360 or R1 on PlayStation 3, and it likewise replenishes the Vitality and PC Gauges. Both healing items also reach your partner: if you use health tablets or First Aid Spray while near your partner, their Life Gauge and Physical Combat Gauge are replenished at the same time as yours. Tablet counts and First Aid Spray therefore cover two characters at once when you are standing close together, so sharing space before healing is a concrete part of the documentation.
Dying, Game Over, and Checkpoint Continues
When the Vitality Gauge hits zero, the player enters the Dying state and a Dying Gauge appears on screen. Many actions become restricted. Only the weapon equipped at the moment of entering Dying can be used, and reloading, switching weapons, or using items are all unavailable. Taking additional damage during this state causes an immediate Game Over. The Dying Gauge refills after a set time, and when it is full, the player returns to the game. A partner in Dying is handled under the same rules, since further damage to either character ends the run.
Game Over also occurs if objectives are not accomplished or certain quick-time events are failed. Choosing Continue restarts play from the last checkpoint. Capcom describes some action-button events as having a limited response time; missing them can lead to Game Over. On Amateur difficulty, life-and-death events are completed automatically, with certain exclusions. Pausing has its own requirement: set Network Selection to Offline in System Settings, then use START. The manual gives the same offline-pause requirement for both controller layouts.
Sources & further reading.
- Resident Evil 6 — official gameplay documentation Retrieved Oct 16, 2026
- Resident Evil 6 — official gameplay documentation Retrieved Oct 16, 2026
- Resident Evil 6 — official gameplay documentation Retrieved Oct 16, 2026
- Resident Evil 6 — official gameplay documentation Retrieved Oct 16, 2026
First published .